

How To Register An Address Into Google Physical Address Location Database
Introduction
Postal addresses are commonly lengthy and sometimes difficult to remember. In that location are a number of scenarios where a shorter address would exist desirable. For case, having the ability to send a short address consisting of only a couple of characters could ensure faster commitment of emergency ambulance services. Pieter Geelen and Harold Goddijn adult the Mapcode system in 2001 to brand it piece of cake to create a short-form accost for any physical address in the world.
In this tutorial, you will develop a spider web app that uses the Google Maps API to generate a curt digital address for whatever accost of your pick. You lot will do this past cloning the base code for this app from GitHub and so calculation code to it that will brand it fully functional. This app will besides be able to retrieve the original physical address from a given mapcode.
Prerequisites
In order to consummate this tutorial, you will need the following:
-
Access to an Ubuntu 18.04 server. This server should have a non-root user with
sudoprivileges and a firewall configured. To set up this up, y'all can follow our Initial Server Setup Guide for Ubuntu xviii.04. -
A LAMP stack installed on your machine. This is necessary considering the application that you are going to develop in this tutorial uses AngularJS and PHP, and the digital address that the application generates will be stored in a MySQL database. Follow our guide on How To Install Linux, Apache, MySQL, PHP (LAMP) stack on Ubuntu xviii.04 to set this up.
-
Git installed on your server. You tin follow the tutorial Contributing to Open up Source: Getting Started with Git to install and gear up Git.
Footstep 1 — Getting a Google API Cardinal
In this tutorial, you will use JavaScript to create an interface to Google Maps. Google assigns API keys to enable developers to use the JavaScript API on Google Maps, which you volition need to obtain and add together to your web app'southward code.
To get your ain API central, head to Google'due south "Become API Key" page. Click on the GET STARTED button in Step 1, and a popular-up will open up as shown in the following paradigm:

Select Maps past clicking the check box and hit CONTINUE. If you aren't already logged into a Google account, you will be asked to do and so. Then, the window will ask you to provide a proper name for the projection, which can be anything you'd like:

Following this, information technology volition enquire you to enter your billing information. Note that Google provides API keys as function of a free trial, merely information technology requires you lot to set up and enable billing in lodge retrieve them.

After inbound this data, your API cardinal will appear on the screen. Copy and store it in a location where you can easily retrieve it, equally you will need to add it to your project code after on.
Afterward obtaining your API key, you can begin building the foundation of your awarding by creating a MySQL database.
Stride 2 — Creating the Database
The web awarding described in this tutorial accepts an address from the user and generates a mapcode for it along with the latitude and longitude of the specified location. You will store this data in a MySQL database so that yous tin can retrieve information technology afterward on merely past inbound the corresponding digital address.
Begin past opening the MySQL shell and authenticating with your password:
- mysql -u root -p
At the prompt, create a database called digitaladdress using the following command:
- CREATE DATABASE IF NOT EXISTS `digitaladdress` ;
Next, select this new database so that you tin create a table within it:
- Utilise `digitaladdress` ;
After selecting the digitaladdress database, create a table called locations within it to store the concrete accost, its longitude, latitude, and the mapcode that your application will create from this data. Run the following CREATE TABLE statement to create the locations tabular array within the database:
- CREATE Table `locations` (
- `digitaladdress` varchar( 50 ) DEFAULT Nothing,
- `state` varchar( 30 ) DEFAULT NULL,
- ` zip ` varchar( thirty ) DEFAULT Nix,
- `street` varchar( 30 ) DEFAULT Zilch,
- `town` varchar( 30 ) DEFAULT NULL,
- `house` varchar( 30 ) DEFAULT NULL,
- `latitude` varchar( 30 ) DEFAULT NULL,
- `longitude` varchar( 30 ) DEFAULT NULL,
- KEY `digitaladdress` ( `digitaladdress` )
- ) ;
This tabular array has 8 columns: digitaladdress, country, zip, street, boondocks, house, latitude, and longitude. The first column, digitaladdress, is indexed using the KEY command. Indexes in MySQL part similarly to how they piece of work in an encyclopedia or other reference piece of work. Any time you lot or your awarding issue a query containing a WHERE statement, MySQL reads every entry in each column, row-by-row, which tin can become an extremely resources-intensive procedure as your table accumulates more and more entries. Indexing a cavalcade like this takes the information from the cavalcade and stores it alphabetically in a separate location, which ways that MySQL will not have to await through every row in the table. It only has to observe the data you're looking for in the index so jump to the corresponding row in the tabular array.
Later adding this tabular array, exit the MySQL prompt:
- exit
With your database and tabular array prepare up and your Google Maps API key in mitt, you're set to create the project itself.
Footstep 3 — Creating the Project
Every bit mentioned in the introduction, we will clone the base of operations lawmaking for this project from GitHub and and so add together some actress code to make the application functional. The reason for this, rather than walking you through the process of creating each file and adding all the lawmaking yourself, is to speed up the process of getting the app running. Information technology will also let the states to focus on adding and understanding the code that allows the app to communicate with both the Google Maps and Mapcode APIs.
You can find the skeleton code for the full project on this GitHub project page. Use the following git control to clone the project to your server:
- git clone https://github.com/do-community/digiaddress.git
This will create a new binder called digiaddress in your home directory. Motility this directory to your server's spider web root. If y'all followed the LAMP stack tutorial linked in the prerequisites, this will be the /var/www/html directory:
- sudo mv digiaddress/ /var/world wide web/html/
This project contains several PHP and JS files to which you'll add together some code afterward on in this tutorial. To view the directory structure, first install the tree package using apt:
- sudo apt install tree
Then run the tree command with the digiaddress directory given as an argument:
- tree /var/world wide web/html/digiaddress/
Output
digiaddress/ ├── README.md ├── db.php ├── fetchaddress.php ├── findaddress.php ├── generateDigitalAddress.php ├── geoimplement.php ├── index.php └── js ├── createDigitialAddressApp.js └── findAddressApp.js You can come across from this output that the project consists of six PHP files and two JavaScript files. Together, these files create the application's 2 chief functionalities: creating a mapcode from a physical address, and decoding a mapcode to retrieve the original physical address. The post-obit files enable the start functionality:
-
index.php -
geoimplement.php -
generateDigitialAddress.php -
db.php -
createDigitialAddressApp.js
The alphabetize.php file contains the lawmaking for the application's user interface (UI), which consists of a form where users tin enter a physical address. The index.php file calls the geoimplement.php file any fourth dimension a user submits the form. geoimplement.php makes a call to the Google Maps API and passes the address along to it. The Google server then responds with a JSON containing the specified address's information, including its latitude and longitude. This information is so passed to the generateDigitalAddress.php file which calls the Mapcode API to obtain a mapcode for the given location, every bit specified by its latitude and longitude. The resulting mapcode, along with the latitude, longitude, and the physical address, are so stored in the database that you lot created in Footstep ii. db.php acts as a helper for this operation. The createDigitalAddressApp.js file performs a number of operations that control the UX elements seen in the app, including setting a marker and boundary rectangle on the Google Maps interface.
The remaining three files enable the second function of the application — that is, retrieving a concrete address from a given mapcode:
-
findaddress.php -
fetchaddress.php -
findAddressApp.js
The findaddress.php file defines the application UI, which is distinct from the one defined in alphabetize.php. The application accepts a previously-generated mapcode as an input and displays the corresponding concrete accost stored in the database. Whenever a user submits this grade, findaddress.php sends a call to fetchaddress.php which and then retrieves the corresponding mapcode from the database. The findAddressApp.js file contains the helper code for setting a marker and a boundary rectangle on the Google Maps interface.
Test the installation past visiting http://your_server_ip/digiaddress in your browser, making sure to change your_server_ip to reflect your server'due south IP address.
Notation: If you don't know your server'south IP accost, you tin run the following curl command. This control will print the folio content of icanhazip.com, a website that shows the IP address of the machine accessing it:
- curl http://icanhazip.com
One time there, you will see this heading at the top of your browser window:
Generate Digital Accost This confirms that you lot have correctly downloaded the projection files. With that, let united states keep with the evolution of the app's primary office: generating a mapcode.
Step four — Developing the Application's UI
While the average code for the application interface is included in the files you downloaded in the previous step, you still need to make a few changes and additions to some of these files to make the application functional and engaging for users. Nosotros will get started with updating the lawmaking to develop the application's UI.
Open the index.php file using your preferred editor. Here, we'll apply nano:
- nano /var/www/html/digiaddress/index.php
Wait for the following line of lawmaking:
/var/www/html/digiaddress/alphabetize.php
. . . <script async defer src="https://maps.googleapis.com/maps/api/js?key=<YOUR Primal>"></script> . . . Supercede <YOUR Cardinal> with the Google API key you obtained in Step 1. Later adding your API cardinal, the line should look similar to this:
/var/world wide web/html/digiaddress/index.php
. . . <script async defer src="https://maps.googleapis.com/maps/api/js?fundamental=ExampleAPIKeyH2vITfv1eIHbfka9ym634Esw7u"></script> . . . Next, detect the following comment in the alphabetize.php file:
/var/www/html/digiaddress/alphabetize.php
. . . <!-- add form code here --> . . . Nosotros'll add a few dozen lines of code below this comment which volition create a form where users can enter the address of a physical location which the application will use to generate a mapcode. Under this comment, add the following highlighted code which creates a title called Enter Accost at the superlative of the grade:
/var/www/html/digiaddress/index.php
. . . <!-- add form code here --> <div class="form-border spacing-top"> <div form="card-header" way="background:#cc0001; color:#ffff"> <h5>Enter Address</h5> </div> <div grade="extra-padding"> . . . Below this, add the post-obit HTML code. This creates a form with five text fields (along with their appropriate labels) where users will input their data:
/var/www/html/digiaddress/index.php
. . . <grade> <div course="form-group input-group-sm"> <label for="land">State</characterization> <input type="text" form="class-control rounded-0 textbox-border" id="country" placeholder="" ng-model="address.land"/> </div> <div class="form-group input-group-sm"> <characterization for="zip" class="blithe-label">Zip</label> <input type="text" class="form-control rounded-0 textbox-depth textbox-border" id="zip" ng-model="address.zip" disabled="disabled"/> </div> <div class="form-group input-grouping-sm"> <label for="town">Town</label> <input type="text" class="grade-control rounded-0 textbox-edge" id="boondocks" ng-model="address.town" disabled="disabled"/> </div> <div course="grade-group input-group-sm"> <characterization for="street">Street</label> <input type="text" class="class-control rounded-0 textbox-border" id="street" placeholder="" ng-model="address.street" disabled="disabled"/> </div> <div class="form-group input-group-sm"> <label for="house">House</label> <input blazon="text" class="form-control rounded-0 textbox-border" id="house" placeholder="" ng-model="address.house" disabled="disabled"/> </div> . . . Beneath the form code, add the post-obit lines. These create two hidden controls which laissez passer along the breadth and longitude information derived from any address submitted through the form:
/var/www/html/digiaddress/index.php
. . . <div class="form-grouping input-group-sm"> <input blazon="hidden" ng-model="address.lat"/> </div> <div class="course-group input-group-sm"> <input type="subconscious" ng-model="address.long"/> </div> . . . Lastly, close out this section past adding the post-obit code. This creates a Generate button which will allow users to submit the grade:
/var/www/html/digiaddress/alphabetize.php
. . . <button type="submit" disabled="disabled" class="btn btn-colour btn-block rounded-0" id="generate" style="colour:#ffff;background-color: #cc0001;">Generate </button> </form> </div> </div> . . . After adding these elements, this department of the file should match this:
/var/www/html/digiaddress/index.php
. . . <!-- add form code here --> <div class="class-edge spacing-height"> <div form="menu-header" fashion="background:#cc0001; color:#ffff"> <h5>Enter Address</h5> </div> <div class="extra-padding"> <form> <div class="course-grouping input-group-sm"> <label for="country">State</label> <input blazon="text" class="form-command rounded-0 textbox-edge" id="state" placeholder="" ng-model="accost.state"/> </div> <div class="form-group input-grouping-sm"> <characterization for="zip" class="blithe-label">Aught</characterization> <input type="text" class="course-control rounded-0 textbox-depth textbox-border" id="zip" ng-model="accost.zip" disabled="disabled"/> </div> <div grade="form-group input-grouping-sm"> <label for="town">Town</label> <input blazon="text" class="form-control rounded-0 textbox-border " id="boondocks" ng-model="accost.town" disabled="disabled"/> </div> <div class="form-group input-group-sm"> <label for="street">Street</label> <input type="text" class="form-command rounded-0 textbox-edge" id="street" placeholder="" ng-model="address.street" disabled="disabled"/> </div> <div class="form-group input-grouping-sm"> <label for="house">House</label> <input blazon="text" form="form-control rounded-0 textbox-border" id="firm" placeholder="" ng-model="address.house" disabled="disabled"/> </div> <div course="form-group input-group-sm"> <input blazon="hidden" ng-model="address.lat"/> </div> <div class="form-group input-grouping-sm"> <input blazon="subconscious" ng-model="accost.long"/> </div> <button type="submit" disabled="disabled" course="btn btn-colour btn-block rounded-0" id="generate" style="color:#ffff;background-color: #cc0001;">Generate </button> </form> </div> </div> <br> </div> <!-- add google map control --> . . . Save the file by pressing CTRL+O then ENTER, and then visit the application in your browser once more:
http://your_server_ip/digiaddress You lot will see the newly-added form fields and Generate button, and the application should look similar this:

At this point, if you enter address information into the form and try clicking the Generate button, nothing will happen. We will add the mapcode generation functionality later on, merely permit's starting time focus on making this folio more than visually engaging by adding a map which users can interact with.
Stride 5 — Calculation Google Maps Controls
When maps are displayed on a website through the Google Maps JavaScript API, they comprise user interface features that allow visitors to interact with the map they run into. These features are known as controls. We volition keep editing the alphabetize.php file to add Google Maps controls to this app and, when finished, users volition be able to view a map adjacent to the input grade, drag it around to view different locations, zoom in and out, and switch between Google'southward map, satellite, and street views.
Discover the post-obit comment inside the index.php file:
/var/world wide web/html/digiaddress/index.php
. . . <!-- add together google map control --> . . . Add together the post-obit highlighted code beneath this annotate:
/var/www/html/digiaddress/index.php
. . . <!-- add google map control --> <div class="col-sm-8 map-marshal" ng-init="initMap()"> <div id="map" class="actress-padding" style="pinnacle: 100%; margin-bottom: 15px;"></div> <label id="geocoordinates" ng-show="latlng" ng-model="lt"></label><br/> <label id="geoaddress" ng-show="address" ng-model="padd"></label> </div> </div> . . . Save the file, then visit the application in your browser again. You will come across the post-obit:

As you can see, nosotros've successfully added a map to the application. You can elevate the map around to focus on unlike locations, zoom in and out, and switch between the map, satellite, and street views. Looking dorsum at the lawmaking y'all just added, find that we've likewise added two label controls that will brandish the geocoordinates and the physical address that were entered on the form:
/var/world wide web/html/digiaddress/index.php
. . . <label id="geocoordinates" ng-show="latlng" ng-model="lt"></label><br/> <label id="geoaddress" ng-show="address" ng-model="padd"></label> . . . Visit the application again in your browser and enter the name of a state in the outset field. When you move your text cursor to the next field, the breadth and longitude labels don't appear, nor does the location shown on the map change to reflect the information you've entered. Let's enable these behaviors.
Step 6 — Calculation Event Listeners
Adding interactive elements to an awarding tin help to proceed its users engaged. Nosotros volition implement a few interactive behaviors in this awarding through the use of event listeners.
An issue is any action that takes identify on a spider web page. Events tin be something done past a user or past the browser itself. Examples of common events are:
- Clicking an HTML push button
- Irresolute the content of an input field
- Irresolute the focus from one folio element to another
An event listener is a directive that tells a program to take a certain action when a specific event takes place. In AngularJS, consequence listeners are defined with directives that generally follow this format:
ng-event_type=expression In this step, we will add an effect listener that helps to procedure the information entered by users into a mapcode whenever they submit the course. We volition also add together a couple more event listeners that volition brand the application more interactive. Specifically, we'll use these listeners to modify the location shown in the awarding map, identify a marker, and draw a rectangle effectually the location as users enter data into the form. Nosotros'll add these event listeners to index.php, so open that file up over again if you've airtight it:
- nano /var/world wide web/html/digiaddress/index.php
Scroll down to the beginning batch of code we added, and find the block that begins with <form>. It volition look similar this:
/var/world wide web/html/digiaddress/alphabetize.php
. . . <form> <div class="form-grouping input-group-sm"> <characterization for="state">State</label> <input type="text" class="course-control rounded-0 textbox-border" id="state" placeholder="" ng-model="address.land"/> </div> <div class="form-grouping input-group-sm"> <label for="zilch" class="animated-characterization">Cipher</label> <input blazon="text" class="form-command rounded-0 textbox-depth textbox-border" id="zip" ng-model="address.cypher" disabled="disabled"/> </div> <div class="form-group input-group-sm"> <label for="boondocks">Town</label> <input blazon="text" class="form-control rounded-0 textbox-border" id="town" ng-model="address.boondocks" disabled="disabled"/> </div> <div class="class-group input-group-sm"> <characterization for="street">Street</characterization> <input type="text" class="form-control rounded-0 textbox-edge" id="street" placeholder="" ng-model="accost.street" disabled="disabled"/> </div> <div form="form-grouping input-group-sm"> <label for="house">House</characterization> <input type="text" class="course-command rounded-0 textbox-border" id="house" placeholder="" ng-model="address.house" disabled="disabled"/> </div> </form> . . . To brainstorm, add together the following highlighted event listener to the opening <form> tag. This lawmaking tells the app to telephone call the processForm office whenever a user submits information through the form. processForm is defined in the createDigitalAddressApp.js file, and serves every bit a helper function that sends the information submitted by users to the appropriate files which then procedure information technology into a mapcode. We volition have a closer look at this function in Footstep 7:
/var/www/html/digiaddress/index.php
. . . <form ng-submit="processForm()" course="custom-class"> <div class="form-group input-grouping-sm"> <label for="state">State</characterization> <input type="text" class="form-control rounded-0 textbox-edge" id="state" placeholder="" ng-model="address.state" </div> . . . Adjacent, keep editing this cake by adding a couple mistiness event listeners. A blur upshot occurs when a given page chemical element loses focus. Add the following highlighted lines to the course block's input tags. These lines tell the awarding to call the geocodeAddress role when a user'south focus shifts abroad from the respective form fields we created in Step iv. Annotation that you lot must also delete the slashes and greater-than signs (/>) that shut out each input tag. Failing to do so will prevent the app from registering the blur events correctly:
/var/www/html/digiaddress/index.php
. . . <form ng-submit="processForm()" class="custom-class"> <div grade="grade-group input-group-sm"> <label for="state">State</label> <input type="text" course="form-control rounded-0 textbox-border" id="country" placeholder="" ng-model="address.land" ng-blur="geocodeAddress(address,'land')" required=""/> </div> <div course="form-grouping input-group-sm"> <label for="zip" course="animated-label">Zilch</label> <input type="text" class="course-control rounded-0 textbox-depth textbox-border" id="zip" ng-model="address.zip" disabled="disabled" ng-blur="geocodeAddress(accost,'zip')" required=""/> </div> <div class="form-group input-group-sm"> <characterization for="town">Boondocks</label> <input type="text" course="class-control rounded-0 textbox-border" id="boondocks" ng-model="accost.town" disabled="disabled" ng-mistiness="geocodeAddress(address,'boondocks')" required=""/> </div> <div course="class-group input-grouping-sm"> <label for="street">Street</label> <input type="text" class="grade-command rounded-0 textbox-edge" id="street" placeholder="" ng-model="address.street" disabled="disabled" ng-mistiness="geocodeAddress(address,'street')" required=""/> </div> <div grade="form-group input-group-sm"> <characterization for="business firm">Firm</characterization> <input blazon="text" class="course-control rounded-0 textbox-edge" id="firm" placeholder="" ng-model="address.house" disabled="disabled" ng-blur="geocodeAddress(address,'house')" required=""/> </div> . . . The first of these new lines — ng-blur="geocodeAddress(address,'state')" required=""/> — translates to "When the user's focus shifts abroad from the 'state' field, phone call the geocodeAddress function." The other new lines also call geocodeAddress, admitting when the user'due south focus shifts abroad from their corresponding fields.
Equally with the processForm function, geocodeAddress is declared in the createDigitalAddressApp.js file, simply in that location isn't all the same any lawmaking in that file that defines it. We will consummate this function so that information technology places a marker and draws a rectangle on the application map after these mistiness events occur to reverberate the information entered into the form. We'll also add some lawmaking that takes the address information and processes it into a mapcode.
Relieve and shut the index.php file (press CTRL+X, Y, then ENTER) and and then open thecreateDigitalAddressApp.js file:
- nano /var/www/html/digiaddress/js/createDigitalAddressApp.js
In this file, find the following line:
/var/www/html/digiaddress/js/createDigitalAddressApp.js
. . . $scope.geocodeAddress = part (address, field) { . . . This line is where nosotros declare the geocodeAddress function. A few lines below this, we declare a variable named fullAddress which constructs a human-readable mailing address from the information entered by a user into the application'south class fields. This is washed through a serial of if statements:
/var/world wide web/html/digiaddress/js/createDigitalAddressApp.js
. . . var fullAddress = ""; if (address ['house']) { athwart.element(document.getElementById('generate'))[0].disabled = false; fullAddress = address ['house'] + ","; } if (address ['town']) { angular.element(certificate.getElementById('street'))[0].disabled = false; fullAddress = fullAddress + accost ['town'] + ","; } if (address ['street']) { angular.element(document.getElementById('house'))[0].disabled = faux; fullAddress = fullAddress + address ['street'] + ","; } if (address ['country']) { angular.element(document.getElementById('cypher'))[0].disabled = simulated; fullAddress = fullAddress + accost ['land'] + " "; } if (address ['zilch']) { athwart.element(document.getElementById('town'))[0].disabled = false; fullAddress = fullAddress + address ['zip']; } . . . Direct after these lines is the following comment:
/var/www/html/digiaddress/js/createDigitalAddressApp.js
. . . // add code for locating the address on Google maps . . . Underneath this annotate, add the following line which checks whether fullAddress is whatsoever value other than null:
/var/www/html/digiaddress/js/createDigitalAddressApp.js
. . . if (fullAddress !== "") { . . . Add together the following code below this line. This lawmaking submits the information entered into the course to the geoimplement.php file using the HTTP POST method if fullAddress is not null:
/var/world wide web/html/digiaddress/js/createDigitalAddressApp.js
. . . $http({ method: 'Mail', url: 'geoimplement.php', data: {address: fullAddress}, headers: {'Content-Type': 'application/x-www-form-urlencoded'} }).then(function successCallback(results) { . . . Adjacent, add together the following line which checks whether the PHP call was returned successfully:
/var/www/html/digiaddress/js/createDigitalAddressApp.js
. . . if (results.data !== "imitation") { . . . If the PHP call was successfully returned, we'll be able to process the result. Add together the following line, which removes any boundary rectangle that may have been previously drawn on the map by calling the removeRectangle office, which is defined at the superlative of the createDigitalAddressApp.js file:
/var/www/html/digiaddress/js/createDigitalAddressApp.js
. . . removeRectangle(); . . . Under the removeRectangle(); line, add together the following four lines which volition create a marker pointing to the new location on the map command:
/var/www/html/digiaddress/js/createDigitalAddressApp.js
. . . new google.maps.Marker({ map: locationMap, position: results.information.geometry.location }); . . . Then add the post-obit lawmaking, which obtains the latitude and longitude information from the result and displays it with the two HTML labels we created in the index.php file in Step 5:
/var/www/html/digiaddress/js/createDigitalAddressApp.js
. . . lat = results.data.geometry.location.lat; lng = results.data.geometry.location.lng; $telescopic.address.lat = lat; $scope.accost.lng = lng; geoCoordLabel = angular.element(document.querySelector('#geocoordinates')); geoCoordLabel.html("Geo Coordinate: " + lat + "," + lng); geoAddressLabel = angular.element(certificate.querySelector('#geoaddress')); geoAddressLabel.html("Geo Accost: " + fullAddress); $telescopic.latlng = true; . . . Lastly, beneath these lines, add the following content. This code creates a viewport which marks a new boundary rectangle on the map:
/var/world wide web/html/digiaddress/js/createDigitalAddressApp.js
. . . if (results.information.geometry.viewport) { rectangle = new google.maps.Rectangle({ strokeColor: '#FF0000', strokeOpacity: 0.8, strokeWeight: 0.5, fillColor: '#FF0000', fillOpacity: 0.35, map: locationMap, bounds: { northward: results.information.geometry.viewport.northeast.lat, south: results.data.geometry.viewport.southwest.lat, e: results.data.geometry.viewport.northeast.lng, west: results.data.geometry.viewport.southwest.lng } }); var googleBounds = new google.maps.LatLngBounds(results.information.geometry.viewport.southwest, results.information.geometry.viewport.northeast); locationMap.setCenter(new google.maps.LatLng(lat, lng)); locationMap.fitBounds(googleBounds); } } else { errorLabel = angular.element(certificate.querySelector('#lt')); errorLabel.html("Identify not found."); $scope.latlng = true; removeRectangle(); } }, role errorCallback(results) { console.log(results); }); } . . . After adding this content, this section of the file will wait like this:
/var/www/html/digiaddress/js/createDigitalAddressApp.js
. . . // add lawmaking for locating the address on Google maps if (fullAddress !== "") { $http({ method: 'Mail service', url: 'geoimplement.php', data: {address: fullAddress}, headers: {'Content-Type': 'application/ten-www-form-urlencoded'} }).then(role successCallback(results) { if (results.data !== "false") { removeRectangle(); new google.maps.Marker({ map: locationMap, position: results.information.geometry.location }); lat = results.data.geometry.location.lat; lng = results.data.geometry.location.lng; $scope.address.lat = lat; $scope.address.lng = lng; geoCoordLabel = angular.chemical element(document.querySelector('#geocoordinates')); geoCoordLabel.html("Geo Coordinate: " + lat + "," + lng); geoAddressLabel = angular.element(certificate.querySelector('#geoaddress')); geoAddressLabel.html("Geo Address: " + fullAddress); $telescopic.latlng = true; if (results.data.geometry.viewport) { rectangle = new google.maps.Rectangle({ strokeColor: '#FF0000', strokeOpacity: 0.eight, strokeWeight: 0.5, fillColor: '#FF0000', fillOpacity: 0.35, map: locationMap, bounds: { north: results.data.geometry.viewport.northeast.lat, south: results.information.geometry.viewport.southwest.lat, due east: results.data.geometry.viewport.northeast.lng, west: results.data.geometry.viewport.southwest.lng } }); var googleBounds = new google.maps.LatLngBounds(results.data.geometry.viewport.southwest, results.information.geometry.viewport.northeast); locationMap.setCenter(new google.maps.LatLng(lat, lng)); locationMap.fitBounds(googleBounds); } } else { errorLabel = angular.element(document.querySelector('#lt')); errorLabel.html("Place not plant."); $scope.latlng = true; removeRectangle(); } }, office errorCallback(results) { panel.log(results); }); } . . . Save the file, but continue it open up for now. If you were to visit the application in your browser once again, you lot wouldn't run into whatever new changes to its advent or behavior. Likewise, if you were to enter an address and click on the Generate push button, the application still would non generate or display a mapcode. This is because we must nonetheless edit a few files earlier the mapcode functionality will piece of work. Let's continue to make these changes, and likewise take a closer look at how these mapcodes are generated.
Stride vii — Understanding Mapcode Generation
While still looking at the createDigitalAddressApp.js file, scroll by the section of code that you added in the previous pace to detect the code that takes the information submitted through the course and procedure it into a unique mapcode. Whenever a user clicks the Generate button, the code within the index.php file submits the form and calls the processForm function, which is divers here in createDigitalAddressApp.js:
/var/www/html/digiaddress/js/createDigitalAddressApp.js
. . . $scope.processForm = part () { . . . processForm then makes an HTTP Postal service to the generateDigitalAddress.php file:
/var/world wide web/html/digiaddress/js/createDigitalAddressApp.js
. . . $http({ method: 'POST', url: 'generateDigitalAddress.php', data: $scope.address, headers: {'Content-Type': 'application/x-www-form-urlencoded'} }).then(part (response) { . . . The Stichting Mapcode Foundation provides the API that generates mapcodes from physical addresses as a free web service. To understand how this call to the Mapcode web service works, close createDigitalAddressApp.js and open up the generateDigitialAddress.php file:
- nano /var/www/html/digiaddress/generateDigitalAddress.php
At the tiptop of the file, yous'll see the following:
/var/www/html/digiaddress/generateDigitalAddress.php
<?php include("db.php"); . . . The line reading include("db.php"); tells PHP to include all the text, lawmaking, and markup from the db.php file inside the generateDigitalAddress.php file. db.php holds the login credentials for the MySQL database yous created in Step ii, and by including information technology within generateDigitalAddress.php, we can add together whatsoever address information submitted through the form to the database.
Below this include statement are a few more lines that obtain the breadth and longitude information based on the request submitted by createDigitalAddressApp.js:
/var/www/html/digiaddress/generateDigitalAddress.php
. . . $data = json_decode(file_get_contents("php://input")); $lat = $data->lat; $long = $information->lng; . . . Look for the following comment in generateDigitalAddress.php file.
/var/www/html/digiaddress/generateDigitalAddress.php
. . . // call to mapcode web service . . . Add the following line of code beneath this comment. This code makes a phone call the Mapcode API, sending lat and long as parameters.
/var/world wide web/html/digiaddress/generateDigitalAddress.php
. . . // telephone call to mapcode web service $digitaldata = file_get_contents("https://api.mapcode.com/mapcode/codes/".$lat.",".$long."?include=territory,alphabet&allowLog=true&customer=spider web"); . . . The web service returns the JSON data which was assigned to digitaldata, and the following argument decodes that JSON:
/var/www/html/digiaddress/generateDigitalAddress.php
. . . $digitalAddress["status"] = json_decode($digitaldata, TRUE)['local']['territory']." ".json_decode($digitaldata, TRUE)['local']['mapcode']; . . . This returns a mapcode for the user-specified location. The following lines then store this information in the database:
/var/www/html/digiaddress/generateDigitalAddress.php
. . . $obj = new databaseConnection(); $conn = $obj->dbConnect(); $obj->insertLocation($conn, $digitalAddress["status"],$data->state,$information->zip,$data->street,$data->town,$data->house,$lat,$long); . . . Then, the concluding line echoes the mapcode dorsum to the caller office:
/var/www/html/digiaddress/generateDigitalAddress.php
. . . repeat json_encode($digitalAddress); Save and close this file, and then reopen createDigitalAddressApp.js again:
- nano /var/www/html/digiaddress/js/createDigitalAddressApp.js
When a mapcode has been retrieved successfully, the following lines in the createDigitalAddressApp.js file displays information technology to the user in a dialog box:
/var/www/html/digiaddress/js/createDigitalAddressApp.js
. . . digiAddress = response.data.status; . . . $('#digitalAddressDialog').modal('show'); . . . Although y'all did add a new line of lawmaking to generateDigitalAddress.php, you yet won't see whatever functional changes when yous visit and interact with the app in your browser. This is considering you've non yet added your Google API cardinal to the geoimplement.php file, which makes the actual call to the Google Maps API.
Step eight — Enabling Calls to the Google Maps API
This application depends on the Google Maps API to translate a physical accost into the appropriate breadth and longitude coordinates. These are so passed on to the Mapcode API which uses them to generate a mapcode. Consequently, if the awarding is unable to communicate with the Google Maps API to generate the location'south latitude and longitude, whatsoever attempt to generate a mapcode will neglect.
Call up from Step six where, after constructing the address data, we passed the result forth via an HTTP Post request in the createDigitalAddressApp.js file:
/var/www/html/digiaddress/js/createDigitalAddressApp.js
$http({ method: 'Post', url: 'geoimplement.php', data: {address: fullAddress}, headers: {'Content-Type': 'application/10-www-form-urlencoded'} }).so(role successCallback(results) { This code block sends the address data entered by a user to the geoimplement.php file which contains the code that calls the Google Maps API. Go ahead and open up this file:
- nano /var/www/html/digiaddress/geoimplement.php
You'll encounter that it first decodes the address that was received through the Mail request:
/var/www/html/digiaddress/geoimplement.php
. . . $information=json_decode(file_get_contents("php://input")); . . . Information technology then passes the accost field of the input data to a geocode function which returns the geographic information on the address:
/var/www/html/digiaddress/geoimplement.php
. . . $upshot = geocode($data->address); . . . The result is then echoed back to the caller:
/var/www/html/digiaddress/geoimplement.php
. . . echo json_encode($result); . . . The geocode part encodes the address and passes it on to the Google Maps API, along with your awarding key:
/var/www/html/digiaddress/geoimplement.php
. . . // url encode the accost $address = urlencode($address); // google map geocode api url $url = "https://maps.googleapis.com/maps/api/geocode/json?address={$address}&key=<YOUR KEY>"; . . . Before scrolling on, go ahead and add your API key to the line under the // google map geocode api url annotate:
/var/www/html/digiaddress/geoimplement.php
. . . // google map geocode api url $url = "https://maps.googleapis.com/maps/api/geocode/json?address={$address}&key=ExampleAPIKeyH2vITfv1eIHbfka9ym634Esw7u"; . . . Afterward sending the call to the Google Maps API, the response is decoded and its value is returned by the function:
/var/www/html/digiaddress/geoimplement.php
. . . // go the json response $resp_json = file_get_contents($url); // decode the json $resp = json_decode($resp_json, truthful); if ($resp['status'] == 'OK') { return $resp['results'][0]; } else { return false; } . . . Save this file, and visit your awarding once once again. Input US-NY in the state field so striking TAB to change the input focus to the side by side field. You volition see the post-obit output:

Find that the geocoordinates and physical accost that you entered in the form appear underneath the map. This makes the application feel much more engaging and interactive.
Note: When it comes to abbreviations for place names, Mapcode uses the ISO 3166 standard. This means that it may not interpret some commonly-used abbreviations every bit expected. For case, if yous'd like to generate a Mapcode for an address in Louisiana and you enter LA, the map will spring to Los Angeles, California (rather than the state of Louisiana).
You tin avoid confusion with US postal abbreviations by preceding them with US-. In the context of this Louisiana case, y'all would enter U.s.a.-LA.
To acquire more well-nigh how Mapcode uses this standard, check out the Territories and standard codes reference page.
Despite this improvement to how the application displays locations on the map, the app nonetheless isn't fully functional. The last step you demand to accept before you can generate a mapcode is to edit the db.php file to allow the awarding to access your database.
Stride ix — Adding Database Credentials and Testing Mapcode Generation
Recall that this application stores every address entered into the form — forth with its latitude, longitude, and mapcode — in the database yous created in Step two. This is made possible by the code within the db.php file, which stores your database credentials and allows the awarding to access the locations table within information technology.
Equally a final step to enable the mapcode generation functionality, open the db.php file for editing:
- nano /var/www/html/digiaddress/db.php
Near the top of this file, find the line that begins with $laissez passer. This line submits your MySQL login credentials in order to allow the application to access your database. Replace your_password with your root MySQL user's password:
/var/www/html/digiaddress/db.php
. . . $username = "root"; $pass = "your_password"; . . . That is the last alter you lot demand to make in order to generate a mapcode from a physical address. Save and close the file, then go ahead and refresh the application in your browser one time again. Enter in an address of your choice and click the Generate button. The output will look similar to this:
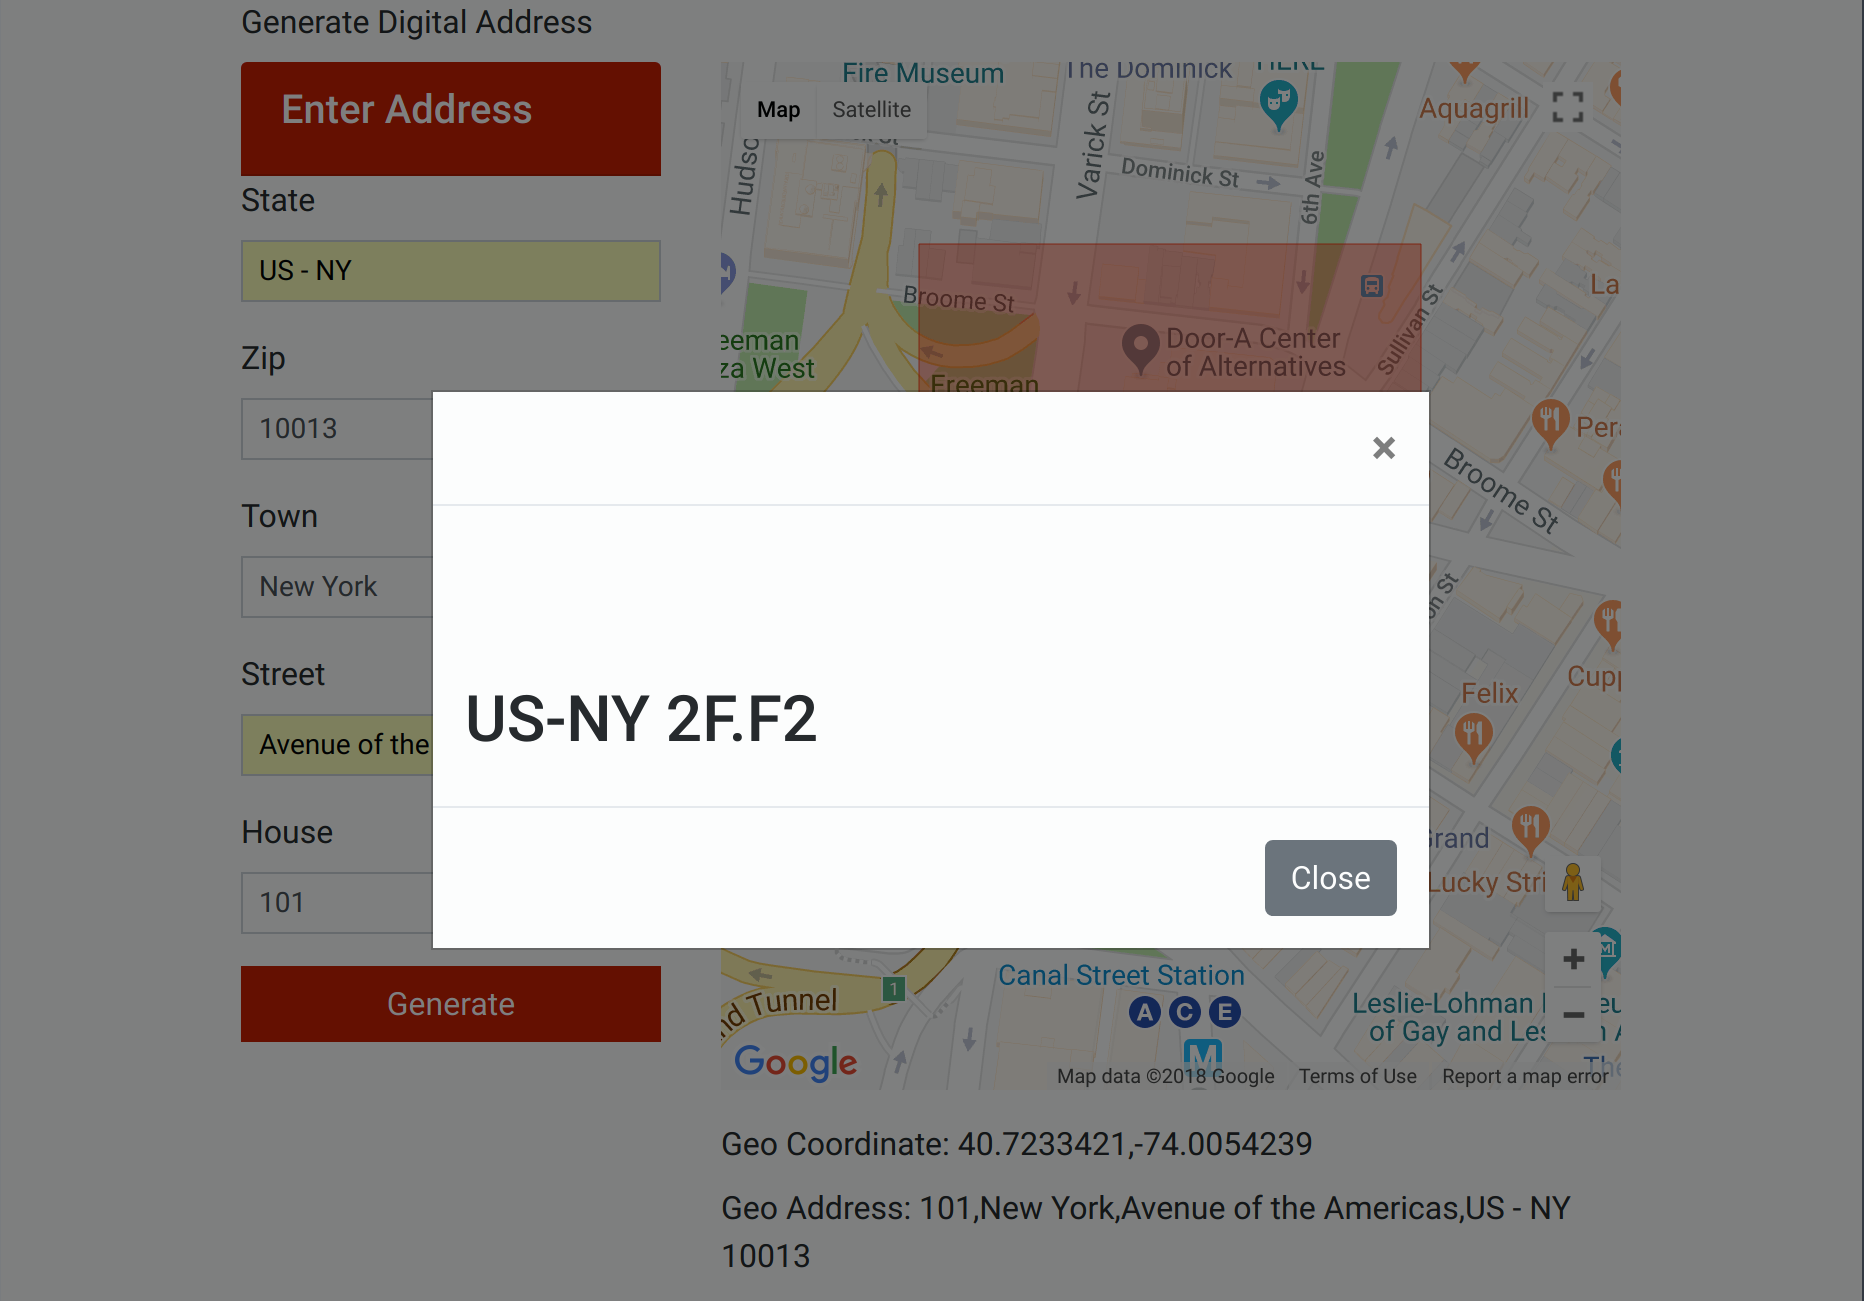
At this stage, you have completed your application and you tin at present generate a short digital address for any physical location in the earth. Feel free to experiment with unlike addresses, and note that the address you enter does not necessarily need to be within the U.s..
Your last job is to enable this app's second functionality: retrieving an address from the database using its respective mapcode.
Footstep ten — Retrieving a Physical Address
Now that you're able to generate a mapcode from a given physical accost, your final stride is to think the original physical address, every bit derived from the mapcode. To accomplish this, we will develop a PHP user interface, shown here:

The lawmaking for this UI is available in the findaddress.php file. As the UI defined within this file is fairly similar to the UI nosotros covered earlier in Step iv, we will not look besides closely at all the details of how information technology works. We will, however, go through these three files to explain generally how they function.
In gild to enable the accost retrieval functionality, you'll demand to add your Google API key to the findaddress.php file, so open it up with your preferred editor:
- nano /var/www/html/digiaddress/findaddress.php
Near the lesser of the file, find the line that begins with <script async defer src=. It volition look like this:
/var/world wide web/html/digiaddress/findaddress.php
<script async defer src="https://maps.googleapis.com/maps/api/js?central=<YOUR Cardinal>"></script> Supervene upon <YOUR Fundamental> with your Google API key as y'all've done in the previous steps, and so save the file. Before closing it, though, permit's accept a quick wait to see how these files work together.
When a user submits the class it triggers a submit upshot, and an event listener calls the fetchadd function:
/var/www/html/digiaddress/findaddress.php
. . . <course ng-submit="fetchadd()" class="custom-form"> . . . The fetchadd function sends the digital address to fetchaddress.php with a POST request:
/var/world wide web/html/digiaddress/js/findAddressApp.js
. . . $http({ method : 'POST', url : 'fetchaddress.php', data : {digiaddress: $scope.digiaddress} }).then(function(response){ . . . If the Post is successful, the office returns a JSON response. The following line parses this response:
/var/www/html/digiaddress/js/findAddressApp.js
. . . var jsonlatlng = JSON.parse(response.data.latlng); . . . The next lines set the marker on the map:
/var/www/html/digiaddress/js/findAddressApp.js
. . . marking = new google.maps.Marker({ position: new google.maps.LatLng(jsonlatlng.latitude, jsonlatlng.longitude), map: locationMap }); . . . And the following prints the geocoordinates and the concrete address:
/var/world wide web/html/digiaddress/js/findAddressApp.js
. . . geoCoordLabel = athwart.chemical element(document.querySelector('#geocoordinates')); geoCoordLabel.html("Geo Coordinate: "+ jsonlatlng.latitude +","+ jsonlatlng.longitude); geoAddressLabel = athwart.element(certificate.querySelector('#geoaddress')); geoAddressLabel.html("Geo Address: " + jsonlatlng.house +","+ jsonlatlng.town +","+ jsonlatlng.street +","+ jsonlatlng.land + " " + jsonlatlng.nothing ); . . . Visit this application in your browser past going to the following link:
http://your_server_ip/digiaddress/findaddress.php Test it out past inbound in the mapcode you obtained earlier. The post-obit effigy shows a typical output:

With that, your application is finished. You can at present create a unique mapcode for whatever location in the world, and so use that mapcode to call up the location's physical address.
Conclusion
In this tutorial you used the Google Maps API to pin a location and gets its longitude, latitude information. This information is used to generate a unique and short digital address using Mapcode API. There are a number of practical utilize cases for mapcodes, ranging from emergency services to archaeological surveying. [The Stichting Mapcode Foundation] (http://world wide web.mapcode.com/aboutus.html) lists several such use cases.
Acknowledgements
Many thanks to Dinesh Karpe and Sayli Patil for developing the entire project code.

How To Register An Address Into Google Physical Address Location Database,
Source: https://www.digitalocean.com/community/tutorials/how-to-generate-short-unique-digital-address-any-location-angularjs-php
Posted by: youngmolaing58.blogspot.com
0 Response to "How To Register An Address Into Google Physical Address Location Database"
Post a Comment